Sometimes your Popsocket might feel a bit underwhelming in its grip, but you don’t need pliers to get it back in shape.
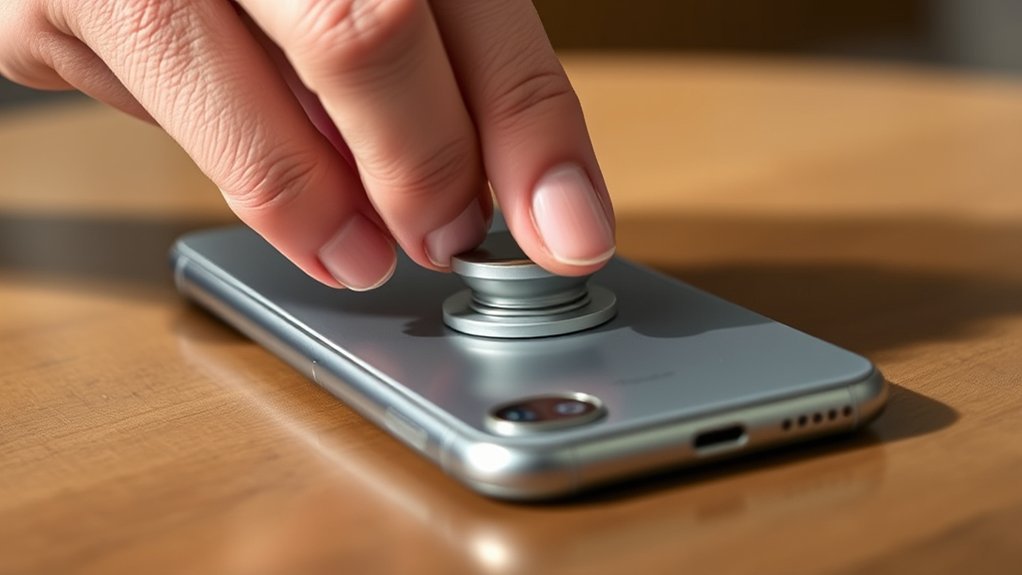
How to fix Popsocket without pliers is simpler than you might think. Start by holding the base firmly with one hand and gently twisting the top with the other, using your fingers for leverage.
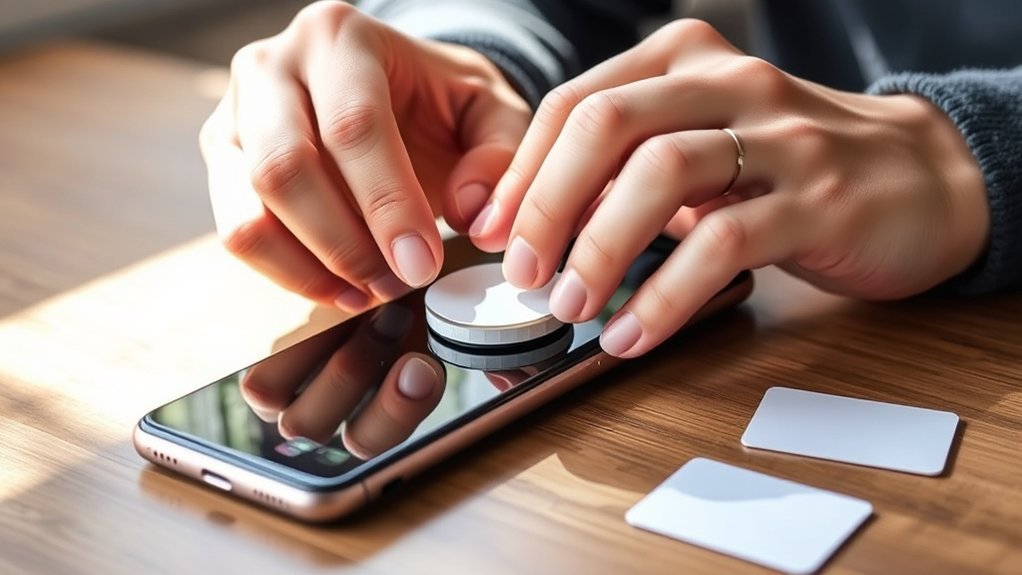
If it’s slippery, a rubber band can help you get a better hold. This simple trick often restores the tightness quickly—yet if it’s still loose, there’s more you can try.
Why Is My Popsocket Loose? How to Identify the Problem
Why does your Popsocket feel loose? It’s often due to adhesive wear or reduced popsocket longevity. First, check if the adhesive pad has dirt or oil, which weakens its grip. Clean the surface and the base of the Popsocket with rubbing alcohol to remove residues.
Next, examine if the Popsocket’s collapsible mechanism is damaged or stretched out. This can cause looseness during use. Also, consider how long you’ve had it; over time, repeated pulling and twisting reduce popsocket longevity by weakening the adhesive and internal components.
Identifying whether the problem is adhesive wear or mechanical strain helps you decide the best fix. By carefully inspecting these factors, you’ll know why your Popsocket feels loose and be ready to restore its stability.
How to Tighten Your Popsocket Without Pliers: Quick Fixes
Although you don’t need pliers to tighten your Popsocket, you do need to apply firm, controlled pressure. Start by gripping the base firmly with one hand. Use your thumb and index finger of the other hand to twist the Popsocket clockwise.
If it’s too slippery, try alternative grip methods like wrapping a rubber band around the base for extra traction. Repeat until it feels snug. These DIY Popsocket repairs prevent loosening without tools.
| Step | Action | Tip |
|---|---|---|
| 1 | Grip base firmly | Use rubber band for grip |
| 2 | Twist clockwise gently | Avoid over-tightening |
| 3 | Test stability | Repeat if still loose |
This quick fix keeps your Popsocket secure and hassle-free.
How to Avoid Damaging Your Phone When Fixing Your Popsocket
When fixing your Popsocket, you should take care to protect your phone’s surface from scratches and pressure damage. First, place your phone on a soft, flat surface like a microfiber cloth to avoid scratches.
Next, use gentle pressure when tightening or adjusting the Popsocket. Too much force can damage your phone or loosen the adhesive.
For adhesive safety, avoid using harsh chemicals or excessive heat, which can weaken the bond or harm your phone’s finish. If you need to remove the Popsocket, peel it off slowly and evenly to prevent residue buildup or surface damage.
Always check that your hands and tools are clean to maintain phone protection during the process. Following these steps will help you fix your Popsocket without risking damage.
How to Clean Your Popsocket and Phone for Better Grip
Start by gently wiping your Popsocket and phone with a microfiber cloth to remove dirt buildup. Use a small amount of mild soap mixed with water on the cloth for tougher grime, but avoid harsh chemicals that can damage surfaces.
Let both dry completely before reattaching the Popsocket to guarantee a better grip.
Removing Dirt Buildup
A clean Popsocket and phone surface improve grip and functionality. Removing dirt buildup is essential to maintain this. Follow these steps to guarantee effective cleaning techniques and dirt prevention:
- Gently peel off the Popsocket from your phone to access both surfaces.
- Use a soft, dry microfiber cloth to wipe away loose dust and dirt from the Popsocket and phone surface.
- For stubborn grime, lightly dampen the cloth with water and carefully clean the areas, avoiding excess moisture.
Regularly cleaning your Popsocket and phone prevents dirt accumulation that weakens adhesion and grip. After cleaning, dry both surfaces thoroughly before reattaching the Popsocket. This simple maintenance step enhances your device’s usability and prolongs the life of your Popsocket’s stickiness.
Using Safe Cleaning Solutions
Although water and a cloth can handle light cleaning, using safe cleaning solutions can tackle tougher grime without damaging your Popsocket or phone surface. Start by selecting gentle cleaning methods, such as a mixture of equal parts water and isopropyl alcohol or a mild dish soap solution.
Dampen a microfiber cloth with your chosen safe solution. Never soak it. Gently wipe your Popsocket and phone, focusing on sticky or oily spots. Avoid harsh chemicals or abrasive tools, as they can degrade materials and reduce grip.
After cleaning, let both items air dry completely before reinstalling or using the Popsocket. Regularly applying these safe solutions will maintain your device’s grip and appearance without risking damage. Following these steps guarantees your Popsocket stays secure and your phone looks fresh.
When and How to Replace Your Popsocket Adhesive

If your Popsocket no longer sticks firmly to your device, it’s time to replace the adhesive. Different adhesive types vary in strength and residue, so choose one compatible with your device’s surface. Here’s how to replace it properly:
- Remove the old adhesive carefully, making certain no residue remains. Use rubbing alcohol to clean the surface.
- Select a new adhesive type, such as double-sided tape or a specialized Popsocket replacement adhesive.
- Align the Popsocket accurately, press firmly, and let it set for several hours to make certain a strong bond.
How to Reattach Your Popsocket Using Household Items
Start by thoroughly cleaning the surface of both your Popsocket and phone to remove any dirt or oils.
Next, gather common household adhesives like double-sided tape or super glue as alternatives to the original adhesive. Carefully apply your chosen adhesive, press the Popsocket firmly onto your phone, and let it set for the best hold.
Clean Surface Preparation
Before reattaching your Popsocket, you’ll want to clean the surface thoroughly to confirm strong adhesion. Proper surface cleaning and preparation techniques confirm your Popsocket sticks firmly and lasts longer.
Follow these steps:
- Remove Dirt and Oil: Use a mild soap and water solution to wipe the phone’s surface, removing any dirt, oils, or residues.
- Dry Completely: Pat the area dry with a lint-free cloth to avoid leaving fibers that weaken adhesion.
- Degrease the Surface: Apply rubbing alcohol on a cotton ball to eliminate any remaining oils for a perfectly clean surface.
These preparation techniques help create an ideal bonding environment, making your Popsocket reattachment successful without extra tools.
Using Adhesive Alternatives
You can reattach your Popsocket using common household items when the original adhesive loses its stickiness. First, clean both the phone surface and the Popsocket base thoroughly.
Next, consider adhesive options like double-sided tape or glue dots for a quick fix. Apply a small piece of tape or a few glue dots evenly on the Popsocket base.
Press firmly onto your phone or case and hold for about 30 seconds to guarantee good contact. Remember, these are temporary solutions and might not last as long as the original adhesive.
If you want a stronger bond, try a thin layer of super glue, but be cautious to avoid excess glue that can damage your device. These simple steps help you keep your Popsocket secure without pliers or special tools.
Easy DIY Adhesive Alternatives to Fix Your Popsocket
Although the original adhesive on your Popsocket might lose its stickiness over time, you can easily replace it with common household glues. Different popsocket designs might require different adhesive types to guarantee a strong bond. Here are three easy DIY alternatives:
- Double-sided tape: Cut a piece to fit your Popsocket base. Press firmly on both surfaces for instant hold.
- Super glue (cyanoacrylate): Apply a small drop to the base, avoid excess to prevent mess. Hold for 30 seconds until set.
- Hot glue: Use a glue gun to apply a thin layer on the base. Quickly press the Popsocket onto your phone and hold until cooled.
These options offer quick, effective fixes without special tools.
How to Maintain Your Popsocket’s Stickiness Over Time
Replacing the adhesive can restore your Popsocket’s grip, but keeping it sticky longer saves time and effort. For effective popsocket maintenance, clean the surface regularly with a damp cloth to remove dirt and oils.
Avoid exposing the adhesive to water or lotion, as moisture reduces adhesive longevity. When not in use, keep the Popsocket extended to prevent dust buildup.
| Action | Benefit |
|---|---|
| Clean regularly | Removes dirt, oils |
| Keep dry | Preserves stickiness |
| Extend when idle | Prevents dust buildup |
Follow these simple steps to maintain your Popsocket’s stickiness and enjoy a strong grip without frequent fixes.
How to Fix a Popsocket That Still Won’t Stay Tight
If your Popsocket still won’t stay tight after cleaning and adhesive care, it’s time to check its internal mechanism. Proper popsocket adjustment can solve this common issue without extra tools. Follow these popsocket troubleshooting steps to fix the problem:
If your Popsocket won’t stay tight after cleaning, adjusting its internal mechanism can fix the issue without extra tools.
- Inspect the collapsible stem: Pull and twist it gently to guarantee it locks firmly in place. Dirt or debris may prevent proper locking.
- Tighten the base: Hold the base firmly and twist the top clockwise to secure the connection. A loose base often causes wobbling.
- Replace worn parts: If the stem or base feels loose despite adjustments, consider ordering replacement parts from the manufacturer.
Conclusion
Fixing your loose Popsocket is like tightening the strings on a guitar—just a little twist brings everything back in tune. By gripping the base firmly and twisting the top clockwise, you’ll quickly restore that secure feel without pliers.
Remember to clean it regularly and avoid over-tightening to keep it working smoothly. These small care steps prevent wear and ensure your Popsocket stays functional.
With these simple steps, your Popsocket will stay snug, giving you a comfortable, reliable grip every time you use your phone. This method is a quick and easy way to fix Popsocket without pliers.